Table of Contents
- 1. Getting Started
- 2. Basic Usage of TortoiseCVS
- 3. Advanced Usage of TortoiseCVS
- 4. Command Reference for TortoiseCVS
- 5. Dialog Reference for TortoiseCVS
- I. Articles, Tips and Tricks
List of Figures
- 2.1. Checkout Dialog
- 2.2. TortoiseCVS and Windows Explorer
- 2.3. Updating Files and Folders
- 2.4. Commit Dialog
- 2.5. Add Dialog
- 3.1. Make New Module Dialog
- 3.2. Make New Repository Question
- 3.3. Tag Dialog
- 3.4. Branch Dialog
- 3.5. Update Special Dialog
- 3.6. Merge Dialog
- 3.7. History Dialog
- 3.8. Revision Graph Dialog
- 5.1. Add Dialog
- 5.2. Checkout Dialog - Module Tab
- 5.3. Checkout Dialog - Revision Tab
- 5.4. Checkout Dialog - Options Tab
- 5.5. Update Special Dialog
- 5.6. Commit Dialog
- 5.7. Progress Dialog
- 5.8. Preferences Dialog - Main Tab
- 5.9. Preferences Dialog - Policy Tab
- 5.10. Preferences Dialog - SSH Tab
- 5.11. Preferences Dialog - Advanced Tab
- 5.12. Preferences Dialog - .cvsignore Tab
- 5.13. Preferences Dialog - Iconset Chooser
- 5.14. History Dialog
- 5.15. Revision Graph Dialog
List of Tables
- 2.1. Icon Overlays
- 2.2. Right-Click Context
Table of Contents
CVS, or the Concurrent Versioning System, is a version control system. Version control systems are generally used as part of the software development cycle to track and co-ordinate source code changes among a team of developers.
For example, bugs sometimes creep in when software is modified, and you might not detect the bug until a long time after you make the modification. With CVS, you can easily retrieve old versions to see exactly which change caused the bug. This can sometimes be a big help.
You could of course save every version of every file you have ever created. This would however waste an enormous amount of disk space. CVS stores all the versions of a file in a single file in a clever way that only stores the differences between versions.
CVS also helps you if you are part of a group of people working on the same project. It is all too easy to overwrite each others' changes unless you are extremely careful. Some editors, like GNU Emacs, try to make sure that the same file is never modified by two people at the same time. Unfortunately, if someone is using another editor, that safeguard will not work. CVS solves this problem by insulating the different developers from each other. Every developer works in his own sandbox, and CVS merges the work when each developer is done.
TortoiseCVS is a front-end client to make using CVS easier and more intuitive. It allows developers to work with files controlled by CVS directly from Windows Explorer™.
One of the major drawbacks of CVS is the command-line interface that is provided. Many developers today are becoming more accustomed to the graphical integrated development environments (IDEs). TortoiseCVS aims to provide that "point-and-click" environment in a clever and intuitive way.
The best way to learn how to use TortoiseCVS is to play with it. Start by installing TortoiseCVS.
If you are new to CVS start following along with Basic Usage of TortoiseCVS.
Once you've learned the ropes check out the advanced features in Advanced Usage of TortoiseCVS.
For pure reference, the chapters Command Reference for TortoiseCVS and Dialog Reference for TortoiseCVS will help you get the most out of TortoiseCVS.
And finally checkout Articles, Tips and Tricks for a complete and enjoyable version control experience.
Table of Contents
CVS has a unique method of working from most other version control systems in that developers can edit the same files concurrently. First you Checkout a version of the source code from the repository into a local copy on your computer. This local copy is called a sandbox.
You then simply edit the files that you want to change. You can Add new files or remove files you no longer require. When you're done you Commit the changes to the repository.
If someone else has changed the same file while you were working on it, then the commit will fail. You must then Update all your source code files from the repository. This will automatically merge the other developers changes into your copy of the file.
Sometimes CVS cannot do this automatically, for example if you both changed the same line of code. This is called a Conflict. Conflicts happen much less often than you might expect. CVS puts both versions of the conflicting code in the file, with markings separating them. Then you manually edit the file to resolve the conflict before you can commit the changes.
This method of working has lots of advantages. Each developer lives in a sandbox. Changes that another developer makes are isolated from you until you want to check in your changes. It stops bottlenecks where people cannot do things because someone else has the file checked out. Any developer can work on files without direct access to the server, they only need to connect to update or commit.
To obtain a module from the CVS server for the first time, is known as a checkout. Checking a module out from the repository creates a local sandbox of the module.

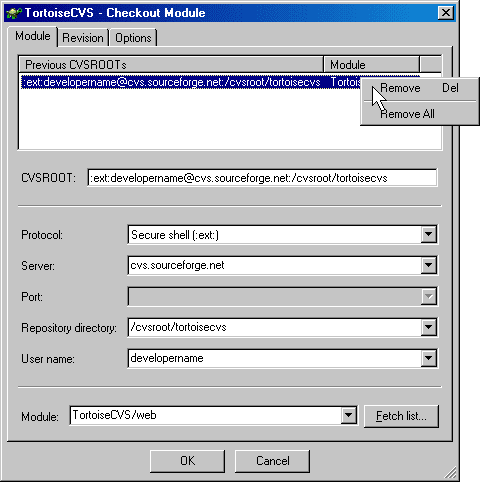
To perform a checkout, Right-click on the folder where you would like the module placed, and pick from the pop-up menu. The Checkout Dialog will appear with the following fields:
Protocol The protocol to use when communicating to the remote CVS repository.
Server The name of the server hosting the remote CVS repository.
Port The port for the remote CVS repository. Not usually required.
Repository Directory The location of the CVS repository on the remote server.
User name The username of your account for the CVS repository.
CVSROOT The full connection string, comprised of the above fields. Often you will be given the connection string in this format, in which can just paste it in here.
Module The name of the module you want to checkout. The module name is case sensitive.
You will need to know this information in advance. Most projects should have some documentation (often online) on how to connect and checkout their modules. Additionally, your software lead, or project manager should be able to provide this information to you.
Note: It is much easier to choose your project checkout settings now than it is to move your project to a different server or protocol later. For example, if your server offers two different CVS protocols, make sure you pick the one that best suits your needs
A folder named after the module will be created within the folder you checkout to, so you can keep all your checked out modules in the same folder, even if they are for different projects.
For more information see CVS Checkout...
Having checked out a module, we can now explore how TortoiseCVS works with Windows™. You will notice that your files appear in Windows Explorer with different icon overlays. Additionally, if you are using either Windows 2000™ or Windows XP™ you will also see new CVS columns in the Detail View Windows Explorer.

The icon overlays indicate a file or folder's status in CVS. The following figure indicates the corresponding status for each icon:
Table 2.1. Icon Overlays
 | Unmodified | The file or folder is up-to-date with the CVS repository version. |
 | Modified | The file or folder has been modified from the current CVS repository version. |
 | Conflict | The file or folder has a conflict with the current CVS repository version. |
 | Not In CVS | The file or folder is not in the CVS repository. |
 | CVS Watch Icon Overlay | The file or folder is controlled under CVS Watch. |
 | Ignore Icon Overlay | The file or folder being ignored by the CVS repository. |
You interact with TortoiseCVS by right-clicking within Windows Explorer and choosing CVS operations from the context menu. Which files and folders the operation is performed on depends on what you have selected and where you have clicked:
Table 2.2. Right-Click Context
 | One or more selected files, the operations is performed on those files. |
 | One or more selected folders, the operations is performed on these folders and the files or folders contained within. |
 | Anywhere else within the Explorer pane, the operation is performed the operation on all files and folders within the view. |
Occasionally you may want changes done by others to get incorporated in your local working copy. The process of getting changes from the server to your local copy is known as Updating. Updating may be done on single files, a set of selected files, or recursively on entire folder hierarchies. To update, highlight the files and/or folders you want, right-click and select . The Progress Dialog will pop up displaying the progress of the update as it runs.

Changes done by others will be merged into your files, keeping any changes you may have done to the same files. The repository is not affected by performing an update.
If you receive reports of conflicts during the update, please read Resolving Conflicts.
For more information see CVS Update.
Making local modifications available in the repository is known as committing the changes. Before committing, you should do an update to make sure there are no conflicts (see Updating your Sandbox).
To commit your changes start by selecting the file(s) or folder(s) that you want to commit. Right-click on the selection, and choose the menu item.

You will then be presented with the Commit Dialog where you can enter a brief summary of what was changed. You can also exclude changed files from the commit by unchecking their checkboxes. Once you are satisfied with what you are committing, click the on the dialog to go ahead with the commit operation.
Please note that committing changes will not automatically add new files that you have created to the repository. See Adding Files and Directories to the Repository on how to add files.
For more information see CVS Commit....
Sometimes, the CVS server will report a conflict when you update your files from the repository. A conflict occurs when two or more developers have changed the same few lines of a file. As CVS knows nothing of your project, it leaves resolving the conflicts to the developers. Whenever a conflict is reported, you should open the file in question, and search for lines starting with the string <<<<<<<.
The conflicting area is marked like this:
<<<<<<< filename
  your changes
=======
  code merged from repository
>>>>>>> revision
You must decide what the code should look like, do the necessary changes, remove the CVS markup, and Commit your modifications to the repository.
If you have made new files or directories you will notice that they appear with the Not In CVS status icon overlay (see Windows Explorer and TortoiseCVS). To put new files or folders under CVS control select the item(s) that you want to add, right-click and choose from context menu to schedule the addition. The Add Dialog is displayed so you can verify the file you are adding.

You do not need to worry about whether a file is ASCII/Text, Unicode/Text, or Binary as TortoiseCVS automatically detects this. For more on how TortoiseCVS handles this see Binary and Unicode Detection.
After an add operation has been performed, the file or files icons appear as "changed". This is because additions are treated as local changes and are not applied to the repository until you Commit them.
Additionally, you can add a number of files and folders to CVS using the command. This operation recursively descends down the folder structure, and displays all unadded files in the Add Dialog. Here you can check and uncheck the files and folders you wish to add to CVS.
For more information see CVS Add and CVS Add Contents....
Table of Contents
Typically a System Administrator will setup the CVS repository on a remote server. TortoiseCVS, however, can configure repositories and modules either locally or remotely (if you have to correct permissions).
To create a new repository and/or module prepare the folders and files locally as a new sandbox. Right-click on the top level folder for your new module or repository and choose the menu item. The Make New Module Dialog will be displayed. Enter the details for the new or existing CVS repository as you would for a Checkout. Click to create the new module.

If the remote CVS server could be reached but the CVS repository does not exists, you will be presented with the following question:

To create the new repository enable the checkbox Initialise a new repository here and click . If you have the right permissions on the remote server TortoiseCVS will setup the new repository.
Once TortoiseCVS has either created a new or connected an existing CVS repository the new module will be created. By default TortoiseCVS uses the name of the selected folder for the new module's name, but you can change this by modifying the Module textbox.
CVS can also follow the semantics of Lock/Unlock that most version control systems use, although CVS calls it Edit/Unedit. This feature, however, is not enabled in CVS by default so before you can begin you need to enable Watch.
You can enable Watch using TortoiseCVS when you Make a New Module by enabling the checkbox Check files read-only. If you wish to enable watch on an existing module, you will need run the following command (using the Command Prompt) on the top level of the module:
cvs watch on
Once Watch is enabled, when performing Checkout or Update the working files will be created as read-only. To change one or more files, select the directory, file or files that you want to modify. Right-click on the selection choose the menu item. This command works slightly different depending on whether the file is text or binary. For binary files (such as .doc), TortoiseCVS performs an Update on the file and then checks if another user is already editing the file. If this is the case, you will not be allowed to edit it. For text files (such as .txt or .cpp), you may work on the file even if another user is already working on it; in this case, TortoiseCVS will notify you of that fact.
When you are done working on the file or files Commit them as you would normally. If, however, you decide that you do not want to make changes select the file or files. Right-click on this selection and choose the menu item. TortoiseCVS will ask you if you want to revert the file to the original version (thus losing your changes).
If you would like to see which files are currently being edited and by whom, right-click anywhere in Windows Explorer and choose the menu item.
At a given stage of development, giving one or more files a common label that refers to their revisions, is known as tagging those files. Tagging is typically used on entire modules, so that the current state of the module can be reconstructed in the future. This kind of tagging should always be done on project deliverables, and before starting major changes.
To tag one or more files or directories with a label, select the directory, file or files that you want to tag. Right-click the mouse button on the selection, and choose the menu item.

You will then be presented with the Tag Dialog. Here you can enter a label in the Tag field. CVS is quite restrictive when it comes to what characters a tag may contain. A tag must start with a letter, and may contain letters, digits, "-" (dash) and "_" (underscore) only. In particular, this means no dots, and no spaces. If you want to include version numbers in a tag, replace the dots with dashes. Two tag names are reserved, as they have special meaning in CVS: "HEAD" refers to the most recent version available in the repository, while "BASE" is the revision you last checked out into the local directory.
Once the label has been entered, press the button. Unlike most CVS operations, the tag is immediately applied to the repository, and no commit is required.
For more information see CVS --> Tag....
Developers occasionally need to undo changes that have already been checked in. Going back to a specific file revision in TortoiseCVS is easy:
Right-click on the file and select to bring up the History Dialog.
Right-click on the revision you need and choose the "Save this revision as..." option.
When the Save As dialog appears, do not click the "Save" button; instead, double-click on the file's name in the directory listing.
Answer "Yes" when TortoiseCVS prompts you to overwrite the file.
One of the features of version control systems, is the ability to isolate changes onto a separate line of development. This line is known as a Branch.
Branching is useful to control changes during the lifecycle of a software project. For example, suppose you have made the first release of your software project version 1.0. You now begin adding new features in preparation for your next major release 2.0. Between your initial release and the new version it is discovered that there are bugs in the software. The current revision of the sources code is in a state of flux and are not expected to be stable for at least another month and therefore there is no way to make a bugfix release based on the newest sources.
Instead of attempting to make the fix to the current version, or the HEAD branch, you would create a branch on the revision trees for all the files that made up release 1.0. You can then make modifications to the branch without disturbing the head branch. When the modifications are finished you can either incorporate them on the head branch or leave them on the release 1.0 branch.
To create a branch, select the directory or files that you want to branch. Right-click the on the selection, and choose from the context-menu.

You will then be presented with the Branch Dialog. Here you can enter a label in the Branch field. The same name restrictions that apply to Tags, apply to branches as well. Once you have entered the desired branch name click the . Unlike most CVS operations, the branch is immediately applied to the repository, and no commit is required. The branch, however, is only applied on the repository. To start working on the newly created branch select the branch to work on.
To start working on a branch instead of the default development line, you have to bind your local copy to the branch. This is needed to make sure that actions such as updates, commits etc. work on the branch rather than on the main line of development.
To move your local copy to another branch, select the top level folder of the project. You can also select the exact folders and files that are part of the desired branch if you know this information. Right-click the on the selection, and choose .

You will then be presented with the Update Special Dialog. Here you can enter the branch name in the Get Tag/Branch/Revision field you wish to select. Click the button, and TortoiseCVS will now do the necessary updates to move your working copy to the desired branch. The updating may also include adding or removing files depending on the state of the branch.
TortoiseCVS puts what is known as sticky tags on the files that are affected by the branch. To remove the sticky tags you must go back to the head branch.
When you are satisfied with the changes you have done on a branch, you may want those changes to be available on the head branch of development. Incorporating changes from one branch to another, is known as merging.
To merge from a branch, move your local copy to the branch you want to merge the changes into. See Selecting a Branch to Work On or Going Back to the Head Branch. Select the top level folder of the project. You can also select the exact folders and files that are part of the desired branch if you know this information. Right-click the on the selection, and choose .

You will then be presented with the Merge Dialog. Here you can enter the branch name in the Branch to merge from field you wish to merge. Click the button, and TortoiseCVS will now merged the branch specified into your local copy. Your changes will not be made on the server repository, until you commit your changes.
The merge given above will try to merge changes from the start of the branch. If you do the operation a second time (to merge changes done to the branch after the last merge), merging from the start of the branch is not what you want, and it will most likely get you into trouble. To get around this problem, you should give the branch a new tag after every merge, and use the new tag when naming the branch for subsequent merges.
If you want to stop working on a branch and move your local copy back to the main line of development, you have to make TortoiseCVS remove all sticky tags.
To remove the sticky tags, and thus update your local copy to the main development line, select the top level folder of the project. You can also select the exact folders and files that are part of the desired branch if you know this information. Right-click the on the selection, and choose .
You will then be presented with the Update Special Dialog. Select the Return to main (HEAD) branch checkbox and click the button. TortoiseCVS will now do the necessary updates to move your working copy back to the head branch.
TortoiseCVS tries to automatically detect the type of file you are adding to CVS. It can detect whether the file is Text/ASCII, Text/Unicode, or Binary. TortoiseCVS first checks the file extension to determine whether the file is Binary or Text. For example “.doc” and “.exe”, are always assumed to be Binary while other extensions, such as “.cpp” and “.txt”, are always assumed to be text. TortoiseCVS does this using a built-in list of Binary and Text extensions which includes most the common file extensions. To customize this list, you can edit the file “FileTypes.config” in the TortoiseCVS installation directory.
By default TortoiseCVS will also examine the first 4000 bytes of a file to determine the type. This is used in cases where the file extension is not known. These first few bytes are also used to determine whether the file is Text/ASCII or Text/Unicode.
TortoiseCVS also provides a sophisticated plugin mechanisim that you can implement a DLL to perform the file type detection. The details of this plugin interface is also available in the “FileTypes.config”.
In all cases, the Add Dialog presents the files you are about to add their file types, so that you have a chance to correct the choices made.
TortoiseCVS provides two methods of reviewing and working with the history of a file. The first is via the History Dialog. You can view a file's history by selecting it and right-clicking .
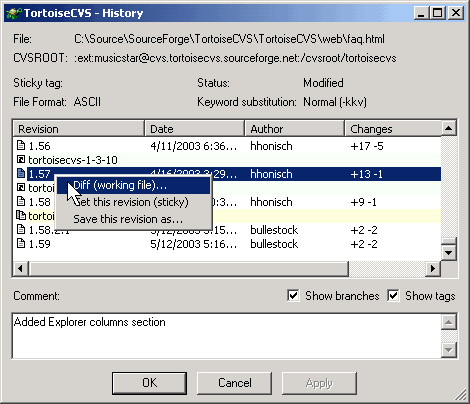
The History Dialog will show a log of the revisions, tags, and branches for the selected file. It will also offer you the opportunity, by right-clicking on a specific revision, tag, or branch, to diff, save the revision locally, or update with sticky tags (an advanced CVS concept; usually, the save option is preferable to a sticky update). You can also edit any current or previous commit message by clicking on a revision and typing into the text area at the bottom of the window
TortoiseCVS also provides a Revision Graph Dialog to graphically show you the history of a file. You can view a file's revision graph by selecting it and right-clicking .

Like the History Dialog, the Revision Graph Dialog will allow you to see the details for and perform CVS operations on any revision, tag, or branch.
Often you an individual might have read access to a CVS repository or module, but not write access. Open source projects typically work this way to maintain quality control for all contributions to a project. The easiest and most reliable way to contribute changes to these projects is by creating a Patch File to submit to them.
In TortoiseCVS this is done by selecting the folders, or files with changes that you wish to include in the patch file. Right-click on your selections and choose from the context menu. You will then be prompted with a Save dialog to indicate where to save your patch file. Finally, TortoiseCVS will open the new patch file in Notepad, where you can validate your changes.
Table of Contents
This chapter is written to illustrate the most main features and functionality of TortoiseCVS. It assumes that a) you already have an understanding of CVS and b) you have access to an already installed a CVS server with created a CVS repository. If you are new CVS then please refer to the section "TortoiseCVS for Beginners."
Download the latest version of TortoiseCVS from the web site (http://tortoisecvs.org/) and save to a temporary location on your hard drive.
Run the installer. If you are running Windows NT or 2000 you must have local admin privileges to install TortoiseCVS correctly.
Choose the location for TortoiseCVS to be installed. The default is “C:\Program Files\TortoiseCVS”.
Choose the installation type, either “Full”, “Compact”, or “Custom installation”. If you desire internationalisation support, you will need either the “Full” or “Custom installation” options.
Once the installer has completed you must reboot the computer for TortoiseCVS to finishing its installation. [1]
Abstract
Creates a local sandbox from a CVS repository.
Create a folder for the sandbox in Windows Explorer
Right-click on the folder.
Select from the context-menu.
The Checkout Dialog will appear. From here you can either enter the repository's CVSROOT into the CVSROOT field, or construct a CVSROOT using the Protocol, Server, Port, Repository name, and User name fields.
If you know the module name you can enter it in the Module field. Conversely, you can checkout an entire repository by entering a period (.) into the Module field. If you do not know the module name you can click on to populate the drop-down with available modules. Note: Some CVS servers do not support this feature; if you cannot populate this list you should contact the CVS server admin.
Click to being checking out the sandbox.
Depending on the protocol and if this is the first time checking out from this CVS repository, you will be prompted to enter a password. Enter the password in the dialog and click .
The Progress Dialog will appear, which provides a detail status of what files are being checked out by TortoiseCVS. By default this dialog will close after the operation is complete, unless it encounters a problem.
Abstract
Synchronizes a local sandbox with a CVS repository.
To update a folder either right-click on it or within it on the Explorer view (but not on any specific files) or to update one or more files select the files to update and right-click on them.
Select from the context-menu.
The Progress Dialog will appear to provide a detail status of the files that are being updated by TortoiseCVS. By default this dialog will close after the operation is complete, unless it encounters a problem.
To update a folder either right-click on it or within it on the Explorer view (but not on any specific files) or to update one or more files select the files to update and right-click on them.
Select from the context-menu.
The Update Special Dialog will appear. Enter into the textbox labeled Get tag/revision/branch: either the Revision number (i.e. “1.3”), Tag (i.e. “release_1_1_0”), or Branch (i.e. “vendorx_branch”) to change your sandbox copy to.
The Progress Dialog will appear to provide a detail status of the files that are being updated by TortoiseCVS. By default this dialog will close after the operation is complete, unless it encounters a problem.
To commit changes either right-click on the folder or selected files to commit changes.
Select from the context-menu.
The Commit Dialog will appear, which will allow you to enter a comment for the commit action. Additionally, you can choose which changes to commit by checking the individual files on the dialog list.
Click once you have entered the appropriate comments and selected the changes to commit.
The Progress Dialog will appear to provide a detail status of the committing process performed by TortoiseCVS. By default this dialog will close after the operation is complete, unless it encounters a problem.
To add files or folders to the CVS select and right-click the files or folders you wish to add. These files must have the CVS Status of Not In CVS.
If you have selected a folder you will be provided the option to in the context-menu. This option will add all files in the selected folder and its sub-folders. Otherwise, to only add those files and folders selected select from the context-menu.
The Progress Dialog will appear to provide a detail status of the adding process performed by TortoiseCVS. By default this dialog will close after the operation is complete, unless it encounters a problem.
To remove one or more files from the CVS repository select the desired files to remove and right-click on them.
Select from the context-menu.
TODO: Finish these steps.
To compare a file to an different version from the CVS repository, select the desired file and right-click on it.
Select from the context-menu.
If this is the first time you have used TortoiseCVS's Diff feature, you will be asked to select an external diff application. WinMerge and ExamDiff are both available free of charge and are well-suited for text-based source code. If you are developing in the LabVIEW programming language, you can use LVDiff to compare your block diagrams visually. CSDiff is designed to compare different versions of Word documents. To use a combination of diff tools based on the file type you are comparing, try meta-diff.
TortoiseCVS will launch the diff tool you have chosen and compare your local copy of the selected file with the version from the repository. For more sophisticated diff options (such as comparing to an older repository copy or comparing two older versions to each other), see File Revision History.
Table of Contents
This chapter details every dialog within TortoiseCVS.


Note
TODO: Write


This dialog indicates whether or not each file has changed in CVS or on the local PC, using the following single-letter codes:
- C
The file has changed both in CVS and locally. TortoiseCVS attempted to merge both sets of changes into the local copy, but could not (probably because both changes were made to the same part of the file). For more information, see Resolving Conflicts
- M
The file has only changed on the local PC. TortoiseCVS will not change the local copy.
- P
The file has changed in CVS, and TortoiseCVS has updated the local copy to match
- U
The file exists in CVS, but not on the local machine. TortoiseCVS will create a copy on the local PC.


Note
TODO: Write
Table of Contents
TortoiseCVS Client Installation Instructions
This document provides instructions for installing and using the TortoiseCVS CVS client software. These instructions are designed for SourceForge.net project developers who are using 32-bit Microsoft Windows platform. It is for developers who would like to work with the source code for a project which is hosted on SourceForge.net. For background information you may like to read the other available documents about CVS.
TortoiseCVS has advantages over WinCVS for work on SourceForge. It has a clearer interface which is integrated into Windows Explorer. WinCVS has a more complex and mature interface. For more obscure commands it may be easier or necessary to use WinCVS.
A particular benefit is that TortoiseCVS has an SSH client built into it, without special setup. Anyone can easily commit code to SourceForge.net projects using TortoiseCVS.
Installing TortoiseCVS
Go to http://tortoisecvs.org/ and download the Download page.
To install, run the executable and follow the instructions.
Since TortoiseCVS is a shell extension, you need to reboot your machine.
Checking out an existing project
If you are working on an existing project first you now need to check out the code.
Make sure you have made an account on SourceForge.net, and that you have been added as a developer to the project you are going to work on. A project administrator needs to do this.
In Windows Explorer go to the folder that you would like to check the code out into.
Right click and from the context menu choose the command ; it's next to the Tortoise icon.
You will need your user name on SourceForge.net, and the project UNIX name. Fill in the dialog as follows:
Protocol: Secure Shell (:ext)
Server: cvs.projectname.sourceforge.net
Directory: /cvsroot/projectname
Username: username
Click Fetch List to get a choice of modules. You will need to enter your password in the dialog at this point. Then pick the module that you would like.
Choose .TortoiseCVS will now check out the code. You will need to enter your password.
You can now alter files and then select on the top level folder to make your changes in the repository. For more information read the TortoiseCVS User's Guide.
Get an error?
If you get an error saying something like “Could not chdir to home folder /home/users/r/rd/rdonkin: No such file or folder” then you need to log into the server with SSH to force creation of your home folder. Do this by connecting to username@cvs.projectname.sf.net either with Putty or a command line SSH.
Working on a new project
If you are working on a new project then you first need to create a new module in the repository.
Create a folder with the name you would like the module to have.
Put the files you would like to add in the folder.
Right click on the folder, and choose from the CVS submenu.
Fill in the dialog as described in the previous section. Note that the module name is filled in for you.
Choose . You will need to enter your password twice, and the module will be made for you.
Proceed to add files and folders by right clicking on them and choosing or from the context menu.
For more information read the TortoiseCVS Daily User's Guide
Tired of entering your password all the time?
You need to make a public/private key pair. The public key goes on the server, and the private key sits on your hard drive. Now, when you connect the server can verify who you are because only you have your private key.
To further protect your private key it is encrypted on your hard disk with a passphrase. You can however choose an empty passphrase, in which case you never have to enter a password but anyone with access to your computer can access your SSH CVS account. Or you can use an SSH Agent (such as Pageant) which will remember your passphrase for the duration of one session, so you only have to enter it once.
TortoiseCVS uses a version of Plink as its SSH client. This means you can use PuTTYgen to make a public/private key pair, and you can use Pageant to point to where the private key is. First of all download them both from the PuTTY web site.
For information on how to use them read the PuTTY documentation on PuTTYgen and Pageant. In particular, make sure you read the sections "8.2: Using PuTTYgen, the PuTTY key generator" and "9.3.1 Making Pageant automatically load keys on startup".
After making your public key with PuTTYgen you need to upload it using the SourceForge.net web interface. Log into the SourceForge web site, and go to your Account Preferences page. Down at the bottom is a section "Shell Account Information" with an entry "CVS/SSH Shared Authorized Keys". You need to add your public key there.
TortoiseCVS differs from Visual Source Safe™ (VSS) in many ways. The most apparent difference may be that TortoiseCVS does not require users to lock the files they are working on, as VSS does by default. In fact, the CVS documentation even encourages users not to use file locking. In the rare occasion where several people have changed the same file at the same time, CVS will normally be able to merge their changes. If two or more developers have changed the same few lines, TortoiseCVS will report a conflict, insert directives in the file, and leave it to the developers to decide what to do. Such conflicts are very rare, as they normally occur as a result of lacking communication between the developers (eg. two people trying to fix the same problem).
Another important difference is that VSS gives you a server view, while TortoiseCVS shows a client view. In practice this means that, unlike VSS, TortoiseCVS will not tell you about changes in the repository until you do an update, or explicitly query the status of selected files. Changes reported by TortoiseCVS reflect modifications done by you after the last checkout, update or commit.
TortoiseCVS icons are Windows icon files that are overlaid on top of source code file icons in Explorer to show their status in CVS. The reason this technique works is that most of the area in a TortoiseCVS icon is transparent, allowing the source icon to show through. If you're designing your own TortoiseCVS icon set, you'll need to strike a careful balance between visibility of the original file and easy viewing of CVS states. Some icon sets achieve this balance by adding a distinctive color or shape to one corner of each icon; others achieve the illusion of shading the entire icon by alternating transparent pixels with colored ones. You can even combine these two ideas of unique shapes and semitransparent shading: see the "NG" icon set that ships with TortoiseCVS for an example.
Create your icon set using a graphics editor. For the best viewing results, you should create 16x16 and 32x32 versions of each icon. The icon editors that ship with the Borland and Microsoft compilers can do this task easily, as can most shareware icon editors. If you prefer to stay with free software, you can use The GIMP to create a 16x16 and 32x32 PNG file for each icon, and then combine them together with png2ico.
Make sure you have created one correctly-named icon for each of the six possible CVS states: TortoiseNotInCVS.ico, TortoiseInCVS.ico, TortoiseInCVSReadOnly.ico, TortoiseChanged.ico, TortoiseConflict.ico, and TortoiseIgnored.ico.
Create a folder inside the directory where you installed TortoiseCVS, name it something that matches the theme of your icon set, and copy your six new icon files into the new folder.
Open the Registry Editor (Click Start >> Run and type "regedit"). Navigate to HKEY_LOCAL_MACHINE\SOFTWARE\TortoiseCVS\CustomIcons. Inside this key, create a new string value. For the name of this new value, type in the name that you would like to call your new icon set. Double-click on the new value to set the actual data, which is the name of the folder you created in step 3.